Coach Parrot Embroidery Review: A Designer’s Project Stitch-Out
The Whimsical Mood of Coach Parrot at First Glance
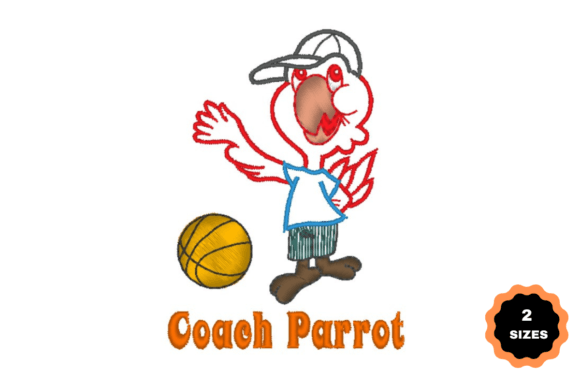
As soon as I opened the digital embroidery file for Coach Parrot, I smiled. Some machine embroidery designs try too hard to be cute or forcefully sporty. This one gets the balance right. The little parrot stands like a pint-sized coach—whistle dangling, cap set at a jaunty angle, and wings full of cheeky confidence. It has the kind of visual personality that makes a handmade product feel thoughtful instead of off-the-rack. When I picture this stitched on a tote bag design or peeking out from the chest of a youth sweatshirt, I see something that will make people stop and grin. That is exactly the reaction a small shop product or personalized gift should create.
The design’s composition leans into a playful sports theme without being limited to one specific sport, which makes it incredibly flexible. A baseball team, a soccer squad, or even a gym class might adopt it. The parrot’s outline and details look clean in the preview, with what appears to be a tasteful mix of satin stitch for the main silhouette and fill stitch for the body and cap. Those stitch choices often give a design a polished, almost applique-like texture that feels great under your fingers. Still, I know from experience that the real test begins the moment the needle hits fabric.
Real-World Stitch-Out: Testing Coach Parrot on Everyday Fabrics
My shop had a custom order for a tee-ball coach’s appreciation gift, so I decided to stitch Coach Parrot onto a sturdy cotton twill tote bag. I wanted to see how the design performed as a focal point on a midweight woven fabric, the kind many craft business owners use for embroidered patch alternatives or boutique merchandise. I loaded the embroidery file, hooped a piece of medium-weight cutaway stabilizer with the tote, and let the machine run.
Right away, the parrot’s personality came through. The satin stitch border around the parrot’s body gave it a crisp, dimensional edge that immediately elevated the tote’s look. The fill stitch in the cap and wings read beautifully even from a few feet away, and the little coach whistle had enough detail to stay recognizable. Thread colors mattered, though. I used the default palette on a natural canvas background, and the contrast was solid. When I later experimented on a heather charcoal sweatshirt, the parrot’s darker cap shading blended with the fabric, and the whistle almost disappeared. A quick thread swap to a slightly lighter gray for those sections fixed it instantly. This is the kind of practical adjustment that turns a good embroidery project into a great finished product.
I also ran a sample on a pre-shrunk hoddie fleece. Fleece can be tricky because its pile swallows fine running stitch details, but the Coach Parrot’s main elements are generous enough to stay clear. I did need to bump up the stabilizer—using a fusible mesh behind the soft knit kept the design from sinking. On stretchy performance tees, I’d proceed with caution. The tight satin stitch sections lack the give that athletic fabrics demand, and without perfect hooping and a sturdy backing, the stitches can pucker after a few wears. For stable wovens, midweight cottons, canvas, and pre-washed fleece, though, this design stitches out with confidence.
A Designer’s Eye: Where Coach Parrot Delivers and Where It Demands Care
From a professional standpoint, Coach Parrot has a lot going for it as a craft business asset. The design’s theme is specific enough to attract buyers searching for sports embroidery without being so narrow that it limits your product lineup. I can see it working on kitchen towels for a coach’s end-of-season brunch, on a baby romper for a sporty family, or centering a custom apron for the grilling aficionado who also runs the little league. That built-in versatility helps Etsy sellers and small shop owners stretch one embroidery file across multiple product categories—and that directly supports healthy profit margins.
However, the design contains a few small details that deserve your attention before you commit to a project. The whistle and its chain, for instance, rely on narrow satin stitch columns and tiny running stitch accents. If you shrink the design too far below the recommended hoop size, those areas will become dense knots or lose definition entirely. I would not go below a size where the whistle still reads as a clear object. Always test the exact dimensions you plan to sell, and look at the stitch-out under good lighting. A lint brush after trimming jump stitches also makes a huge difference on small, intricate sections.
Curved surfaces like caps present another variable. The parrot’s beak and coach’s cap brim sit on a horizontal plane that can twist slightly on a cap’s compound curve, especially near the seam. Using a cap hoop and adding a light water-soluble topper will help keep those details sharp. I also recommend avoiding thick garment seams or heavily layered fabric right under the design. The extra bulk makes hoop alignment tricky and can distort the satin stitch finish.
Washability is another practical concern. On items that will see frequent laundering—gym towels, kids’ apparel—the fill stitch density must work hand in hand with the right stabilizer. I used a no-show mesh on the back of a tea towel after testing, and it held up nicely through ten gentle cycles. My rule of thumb for commercial embroidery is to include a care instruction tag with every handmade product: wash inside out, cool iron no steam, and never bleach. That small step builds customer trust and keeps your finished product looking sharp for years.
Project Ideas Where Coach Parrot Genuinely Belongs
If you are staring at your inventory and wondering what to stitch next, Coach Parrot practically hands you a list. These aren’t theoretical pairings—they’re product categories I have either tested myself or would confidently recommend to fellow embroidery designers and makers.
- Tote bag design for coach gifts: A sturdy natural canvas tote with Coach Parrot centered on the front pocket. Combine it with a name or team year using a separate embroidery font for a genuinely personal feel.
- Custom apparel for youth sports families: A pre-shrunk sweatshirt with the parrot on the front left chest, small but impactful. The design’s playfulness suits kids’ sizes as well as adult crewnecks.
- Embroidered patch sets: Stitch the design on twill or felt, cut it out, and turn it into a sew-on or iron-on patch. This approach opens up a whole patch-collection spin for sports-themed craft fair products.
- Kitchen textiles for the coach who cooks: Flour sack tea towels or a twill apron get an unexpected dose of charm. Thread colors can easily shift to match a kitchen palette while keeping the sports accent.
- Baby embroidery for sporty showers: On a soft, brushed cotton onesie, Coach Parrot becomes an adorable nursery decor piece or a gift for a family that lives and breathes game day. Just be sure to back the stitches with a soft stabilizer so nothing scratches delicate skin.
- Holiday embroidery with a twist: Picture the parrot wearing a tiny Santa hat stitched in alongside the design—or simply change the thread colors to seasonal tones. It gives your holiday embroidery lineup a memorable character without starting from scratch.
- Pillow covers and room accents: A 12-inch square pillow cover with the design centered and a coordinating sports-themed fabric border makes a quick boutique product that photographs beautifully for Etsy listings.
Essential Embroidery Notes Before You Sell or Gift Coach Parrot
Whenever I prep a design for commercial embroidery or a personalized gift, I follow a mental checklist. Coach Parrot is no exception, and these steps kept my stitch-outs consistent and professional.
- Run a fabric test first: Always stitch a sample on the exact material you plan to use. Even subtle differences in fabric texture change how the design reads.
- Review stitch density in person: The preview tells you part of the story. Look at the physical stitch-out. If any area feels too stiff, consider replacing some fill stitch with a lighter pattern using your editing software—provided the embroidery file license allows modifications.
- Confirm the hoop size your machine accepts: The design comes with multiple machine file formats, but you must match the hoop dimensions it was digitized for. Do not assume you can resize drastically without affecting small details like the whistle.
- Inspect every tiny element: Use a magnifier or macro lens on your phone after stitching. Loose threads or slightly misaligned satin borders become obvious and are easy to fix before the product reaches a buyer.
- Test thread color contrast on both light and dark backgrounds: What pops on white may disappear on charcoal. Keep a few spools of high-contrast thread handy for those adjustments.
- Use the right stabilizer for the job: Wovens typically do well with a medium cutaway; fleece and knits need a permanent cutaway or a quality no-show mesh. A topper prevents the stitches from sinking into textured fabrics like toweling or thick canvas.
- Check the designer’s commercial use policy: Before you list a handmade product with Coach Parrot in your Etsy store or sell it at a boutique, verify the license. Most digital design assets intended for small businesses allow commercial use of finished products, but it’s never safe to assume. A quick message to the shop or a look at the listing terms takes two minutes and protects your craft business.
- Save a test stitch-out for your own portfolio: Keep a hoop-ready sample in your studio as a tangible reference. When a new customer asks to see what your custom apparel looks like up close, an actual embroidered piece beats any printable mockup.
Coach Parrot fills a unique space in the embroidery project lineup. It is quirky enough to feel special, sporty enough to suit team spirit, and well enough digitized that my test pieces held up under real use. If you approach it with the same care you would give any detailed machine embroidery design—checking fabric, stabilizer, size, and color choices—you will end up with a finished product that genuinely makes people smile. And for a small shop owner, that reaction is worth more than any listing description.